Billing
Overview
Your NextGen Leads account uses a prepaid balance. You add funds to your balance, and your campaigns use that balance to buy leads. When your balance runs out, your campaigns stop buying leads until you add more funds.
All payments are processed securely by Stripe. Your full card number is never stored by NextGen Leads. Note: Only Account Admin users have access to Billing features. Please reach out to your account manager with any questions.
This guide covers:
- Billing Settings
- Adding funds
- Auto-funding
- Transactions
Billing settings
Go to Billing > Billing Settings to see your balance, manage how you pay, and set up auto-fund.
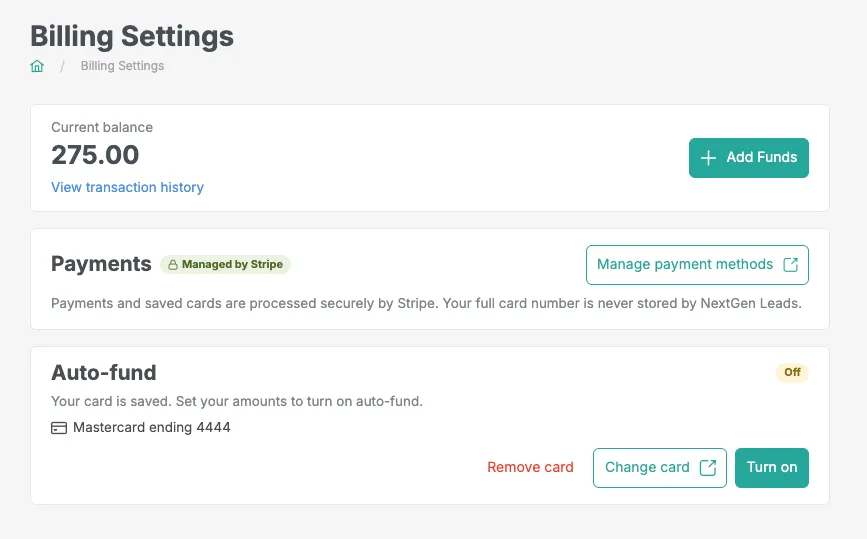
Billing Settings has three sections:
- Current balance: shows the funds available in your account. Select Add Funds to add more, or View transaction history to see past activity
- Payments: Select Manage payment methods to open the Stripe billing portal. There you can view, add, or remove saved cards.
- Auto-fund: Shows whether auto-funding is set up, off, or on. See Auto-funding below.
You can also open the Stripe billing portal from Billing > Billing Portal (External) in the side menu.
Adding funds
Where to add funds
You can add funds from three places:
- The balance in the top bar: Click the + next to your balance. This is available on every page.
- Billing > Add Funds in the side menu.
- The Add Funds button on Billing Settings.
All three open the same Add Funds window.
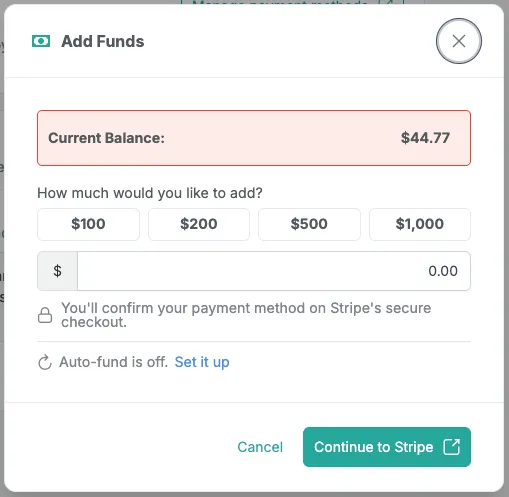
How to add funds
- Choose an amount ($100, $200, $500, or $1000), or type your own amount.
- Select Continue to Stripe.
- On Stripe's secure checkout, choose how you want to pay.
- Select Pay.
After your payment goes through, you return to NextGen Leads. A confirmation page shows the amount added, your new balance, and how you paid. Select Back to return to the page you were on.
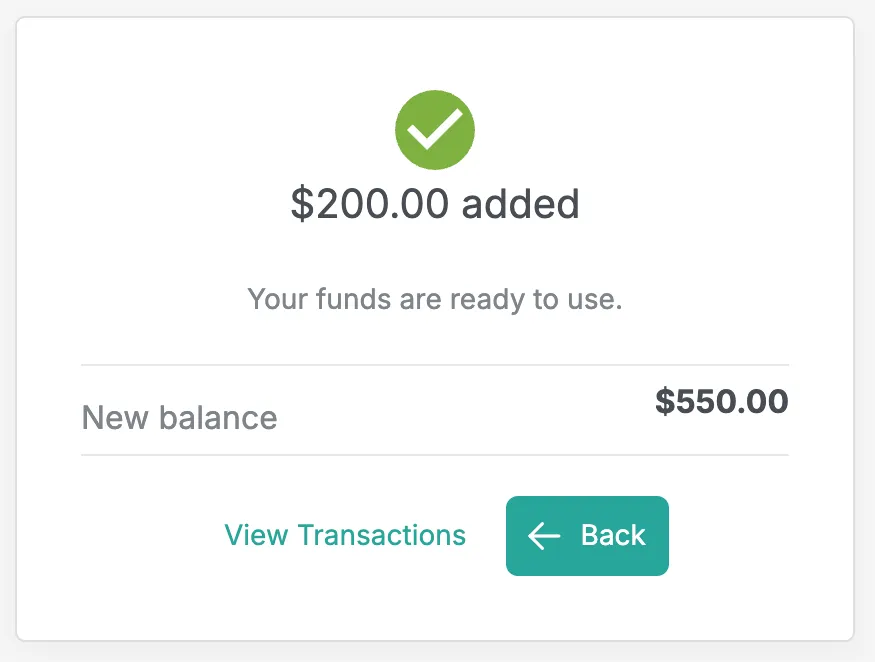
Auto-funding
Auto-fund adds funds to your account automatically when your balance drops below an amount you choose. You don't have to remember to top up, and your campaigns keep buying leads without a break. You get an email receipt each time auto-fund adds funds.
Tip
Pair auto-fund with campaign budgets to keep leads coming in while you stay in control of your spend:
- Set a daily budget on each campaign so it never spends more than you want in a day.
- Enable auto-fund so your balance never runs out before your campaigns reach their budgets.
Set up auto-fund
Auto-fund setup has two simple steps. Go to Billing > Billing Settings and find the Auto-fund section.
Step 1: Save a card
- Read the authorization and check the box to agree.
- Select Save card in Stripe.
- Enter your card on Stripe's secure page and save it.
Saving a card will not charge it until you enable the setting and turn on your campaigns.
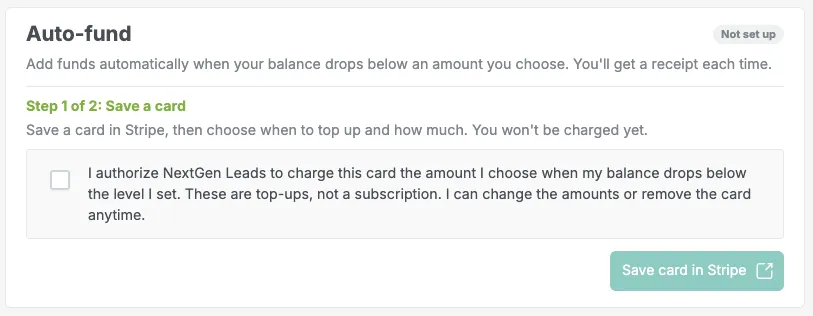
Step 2: Set your amounts
After you save your card, you return to Billing Settings
- In When my balance drops below, enter the balance that should trigger a top-up.
- In Add this amount, enter how much to add each time.
- Select Turn on auto-fund.
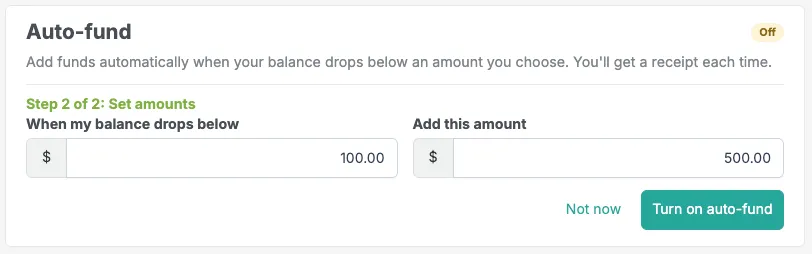
If you select Not now, your card stays saved and auto-fund stays off. You can turn it on later.
Auto-fund status
The Auto-fund section shows one of three statuses
Status | What it means | What you can do |
|---|---|---|
Not set up | No auto-fund card is saved. | Start setup. |
Off | A card is saved, but auto-fund is not active. | Select Turn on to set your amounts, change your card, or remove it. |
On | Auto-fund is active. | Edit your amounts, change your card, remove your card, or turn auto-fund off. |
Change or turn off auto-fund
- Edit amounts: change your top-up level or amount.
- Change card: save a different card in Stripe.
- Turn off: stop auto-fund. Your card stays saved.
- Remove card: delete your auto-fund card. Auto-fund turns off.
If you remove your auto-fund card in the Stripe billing portal, auto-fund also turns off.
Transactions
Go to Billing > Transactions to see all activity on your account, including deposits, auto-fund top-ups, and transfers.
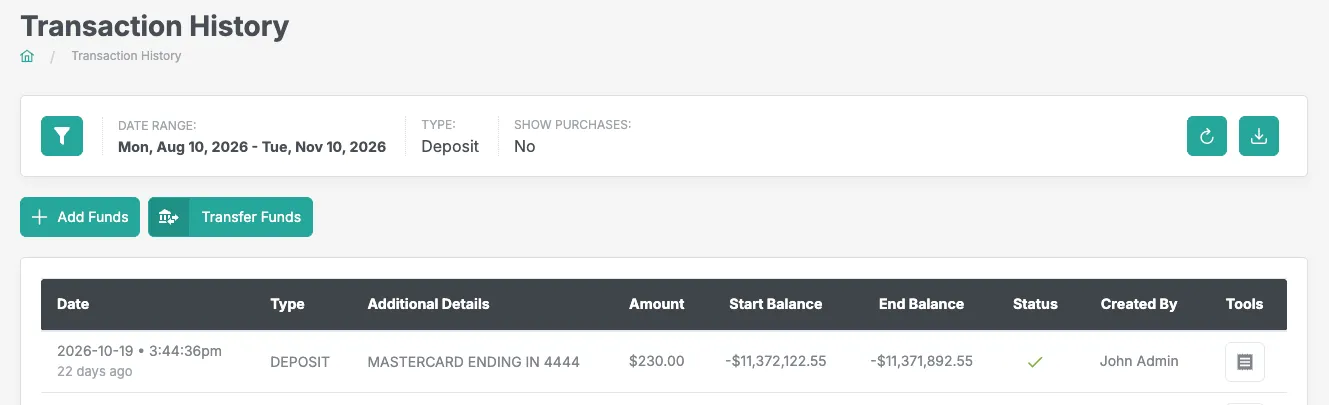
Filter your transactions
Select the filter icon to narrow the list:
- Date range: choose the dates to show.
- Transaction type: show only certain types, such as deposits.
- Show Purchases: include lead purchases in the list.
Select Apply to update the list.
View a receipt
Select the receipt icon in the Tools column of any transaction to see its details.
Download your transactions
Select the download icon at the top right to export your transaction list.